Add and manage MCP servers in VS Code
Add an MCP server when a coding task needs information or actions that your agent's existing tools don't provide. For example, a server can let the agent query a database or update an issue in an external service instead of asking you to perform those steps manually.
Model Context Protocol (MCP) is an open standard for connecting AI models to external tools and services. In Visual Studio Code, servers expose these capabilities as tools. MCP servers can also provide resources, prompts, and interactive apps.
If the tools already available meet your needs, you don't need an additional server. Adding one means configuring access and deciding whether to trust the server.
For background on how MCP fits into the AI customization framework, see Customization concepts and Tools concepts.
This article covers how to add, configure, and manage MCP servers. To learn how agents invoke tools, see Use tools with agents.
Use the Agent Customizations editor (Preview) to discover, create, and manage all your agent customizations in one place. Run Chat: Open Customizations from the Command Palette.
Quickstart: use an MCP server in chat
This walkthrough demonstrates adding an external tool provider with the Playwright MCP server. If your goal is browser interaction rather than learning MCP setup, check the built-in browser tools first. They don't require an MCP server.
-
Open the Extensions view (⇧⌘X (Windows, Linux Ctrl+Shift+X)) and enter
@mcp playwrightin the search field. -
Select Install to install the Playwright MCP server in your user profile.
-
When prompted, confirm that you trust the server to start it. VS Code discovers the server's tools and makes them available in chat.
-
Open the Chat view (⌃⌘I (Windows, Linux Ctrl+Alt+I)) and enter a prompt that uses the Playwright tools. For example:
Go to code.visualstudio.com, decline the cookie banner, and give me a screenshot of the homepage.VS Code invokes the Playwright tools to open the page in a browser, and take a screenshot. You might be asked to confirm each tool invocation.
Select the Configure Tools button in the chat input to see all available tools for the Playwright MCP server and toggle specific tools on or off.
Add an MCP server
Add a server from the Agent Customizations editor
Use the Agent Customizations editor to add a server through a guided flow:
- Run Chat: Open Customizations from the Command Palette (⇧⌘P (Windows, Linux Ctrl+Shift+P)), and then select MCP Servers.
- In the User or Workspace group, select Add Server (plus icon).
- Choose how to add the server:
- Select Command (stdio) to run a local MCP server, and then enter the command and optional arguments.
- Select HTTP to connect to a remote HTTP or Server-Sent Events (SSE) server, and then enter the server URL.
- Select Add from another application to configure automatic discovery from another supported application.
- Select Browse MCP Servers to find a server in the MCP server gallery.
- For a manually configured server, enter a unique server ID and choose the configuration target and file when prompted. The available targets depend on your current agent session, workspace, and remote environment.
The same guided flow is available through the MCP: Add Server command.
Install from the MCP server gallery
To install an MCP server from the MCP server gallery:
-
Open the Extensions view (⇧⌘X (Windows, Linux Ctrl+Shift+X)) and enter
@mcpin the search field. This shows the list of available MCP servers in the gallery. -
You can install an MCP server in your user profile or in your workspace:
-
To install in your user profile, select Install.
-
To install in your workspace, right-click the MCP server and select Install in Workspace. This updates the
.vscode/mcp.jsonfile in your workspace.
-
-
To view the MCP server details, select the MCP server in the list to open the details page.
Local MCP servers can run arbitrary code on your machine. Only add servers from trusted sources, and review the publisher and server configuration before starting it. Read the Security documentation for using AI in VS Code to understand the implications.
Configure the mcp.json file
You can manually configure MCP servers in the following locations:
| Scope | File and format | When to use |
|---|---|---|
| Workspace | .mcp.json at the workspace root, with servers in a top-level mcpServers object |
Preferred for configurations that you share with your team and compatible tools. Copilot harness sessions read this file directly. |
| Workspace | .vscode/mcp.json, with servers in a top-level servers object |
Use for VS Code-specific capabilities such as input variables, development mode, and per-server sandboxing. |
| User | $COPILOT_HOME/mcp-config.json, or ~/.copilot/mcp-config.json when COPILOT_HOME is not set, with servers in a top-level mcpServers object |
Preferred for personal configurations that you use across workspaces and compatible Copilot tools. |
| User profile | mcp.json in your user profile, with servers in a top-level servers object |
Use for profile-specific VS Code configurations. Run MCP: Open User Configuration to open the file. |
Include workspace configuration in source control to share MCP servers with your team.
When the guided flow asks for a configuration file, choose .mcp.json to save a portable configuration at the workspace root, or Copilot Global to save it in $COPILOT_HOME/mcp-config.json with ~/.copilot/mcp-config.json as the fallback location. The flow also lists the deprecated .vscode/mcp.json and VS Code user-profile destinations for compatibility. Prefer the portable destinations for new servers. The Experimental
chat.mcp.workspaceRootConfig.enabled
setting controls whether the workspace-root .mcp.json destination appears.
For Copilot harness sessions, use workspace .mcp.json or user $COPILOT_HOME/mcp-config.json files, with ~/.copilot/mcp-config.json as the fallback user location. The agent reads these files directly, and compatible Copilot tools can share them. VS Code also forwards eligible configurations from other supported sources, including .vscode/mcp.json, except configurations that require interactive input, such as ${input:...} variables. The agent doesn't read .vscode/mcp.json directly.
Avoid hardcoding sensitive information like API keys. Use input variables or environment files instead.
The following examples configure a remote MCP server and a local MCP server in each format:
{
  "mcpServers": {
    "github": {
      "type": "http",
      "url": "https://api.githubcopilot.com/mcp"
    },
    "playwright": {
      "command": "npx",
      "args": ["-y", "@microsoft/mcp-server-playwright"]
    }
  }
}
{
  "servers": {
    "github": {
      "type": "http",
      "url": "https://api.githubcopilot.com/mcp"
    },
    "playwright": {
      "command": "npx",
      "args": ["-y", "@microsoft/mcp-server-playwright"]
    }
  }
}
VS Code provides IntelliSense for the configuration file. For the full configuration schema and field reference, see the MCP configuration reference.
MCP servers run wherever they are configured. Servers in your user profile run locally. If you're connected to a remote and want a server to run on the remote machine, define it in the workspace settings or remote user settings (MCP: Open Remote User Configuration).
Other options to add an MCP server
Add an MCP server to a dev container
MCP servers can be configured in Dev Containers through the devcontainer.json file. This allows you to include MCP server configurations as part of your containerized development environment.
To configure MCP servers in a Dev Container, add the server configuration to the customizations.vscode.mcp section:
{
  "image": "mcr.microsoft.com/devcontainers/typescript-node:latest",
  "customizations": {
    "vscode": {
      "mcp": {
        "servers": {
          "playwright": {
            "command": "npx",
            "args": ["-y", "@microsoft/mcp-server-playwright"]
          }
        }
      }
    }
  }
}
When the Dev Container is created, VS Code automatically writes the MCP server configurations to the remote mcp.json file, making them available in your containerized development environment.
Install an MCP server from the Customization Marketplace (Experimental)
The Customization Marketplace provides an alternative way to find MCP servers from configured sources:
- Turn on the chat.customizations.marketplace.enabled setting.
- Run Chat: Open Customizations from the Command Palette (⇧⌘P (Windows, Linux Ctrl+Shift+P)), and then select Discover.
- From the source menu, select GitHub Feed, and then search for a server by name or add
@type:mcpto your search. - Select a server and review its source, product image, publisher details, and installation requirements.
- Select Install.
Some servers don't support automatic installation. Follow the publisher's setup instructions when they are provided.
Automatically discover MCP servers
VS Code can automatically detect and reuse MCP server configurations from other applications, such as Claude Desktop.
With the chat.mcp.discovery.enabled setting, you can select one or more tools from which to discover their MCP server configuration.
Supported sources include Claude Desktop, GitHub Copilot CLI, Cursor, and Windsurf. Learn more about automatic MCP server discovery, including configuration locations and remote behavior.
Install an MCP server from the command line
You can also use the VS Code command-line interface to add an MCP server to your user profile or to a workspace.
To add an MCP server to your user profile, use the --add-mcp VS Code command line option, and provide the JSON server configuration in the form {\"name\":\"server-name\",\"command\":...}.
code --add-mcp "{\"name\":\"my-server\",\"command\": \"uvx\",\"args\": [\"mcp-server-fetch\"]}"
Manage MCP servers
VS Code provides several options to manage your MCP servers, such as starting or stopping a server, viewing logs, uninstalling, or clearing cached tools.
| Method | Description | |
|---|---|---|
| Agent Customizations editor | Open the MCP Servers section and select a server to view or edit its configuration. Use the ellipsis (...) menu for server actions. | |
| Extensions view | Right-click a server in the MCP SERVERS - INSTALLED section or select the gear icon. | 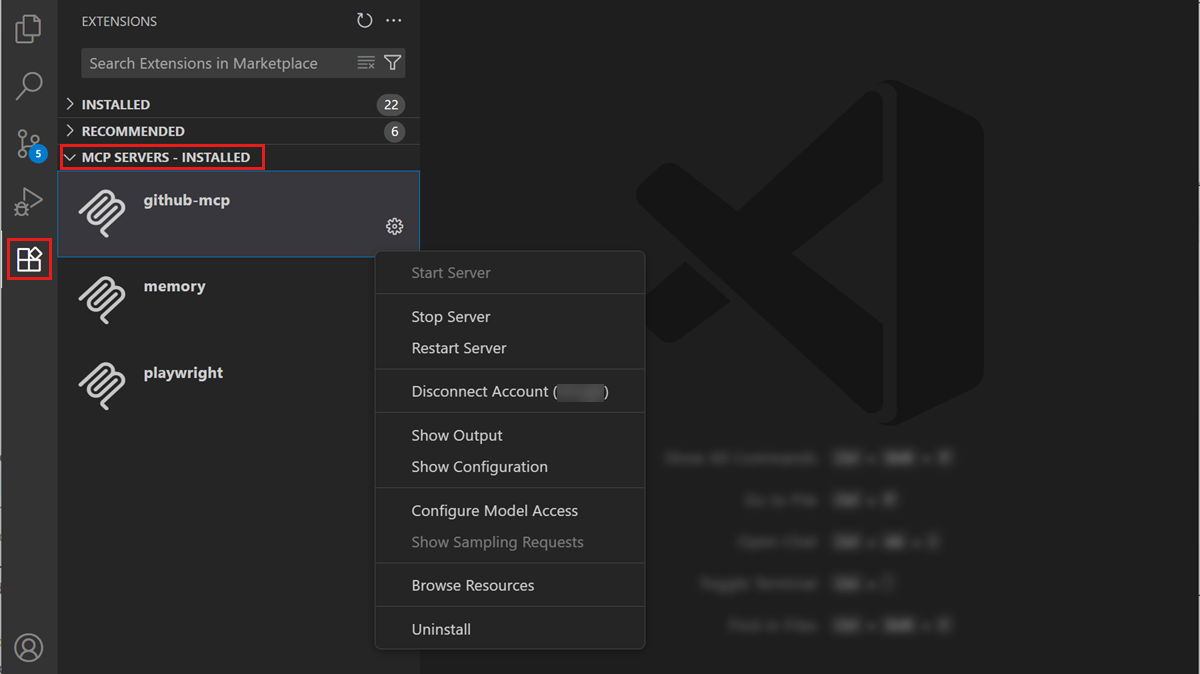 |
mcp.json editor |
Open the configuration file and use the inline actions (code lenses). Use MCP: Open User Configuration or MCP: Open Workspace Folder MCP Configuration to open the file. | 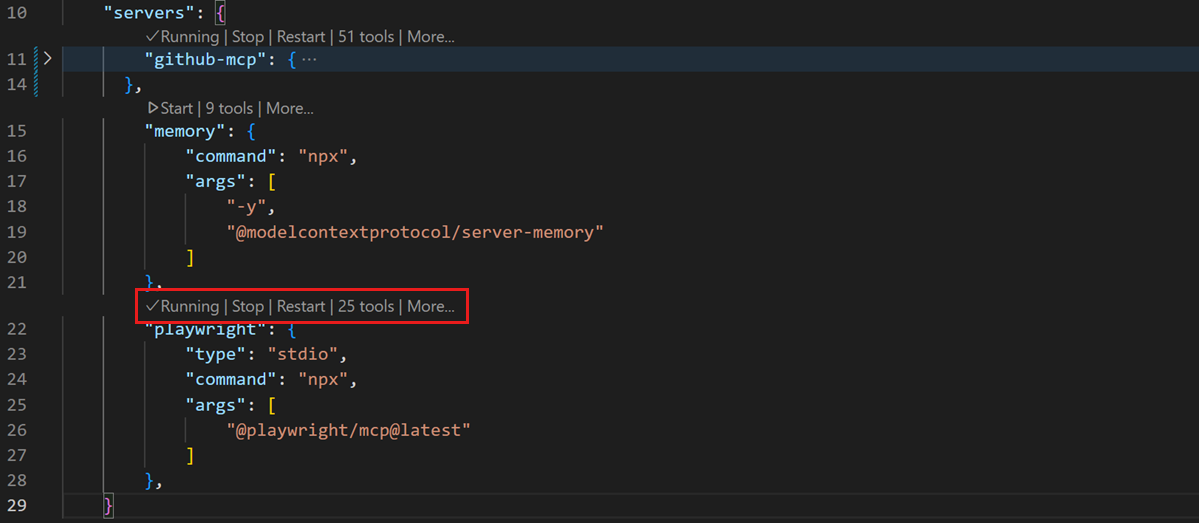 |
| Command Palette | Run MCP: List Servers, select a server, and choose an action. | 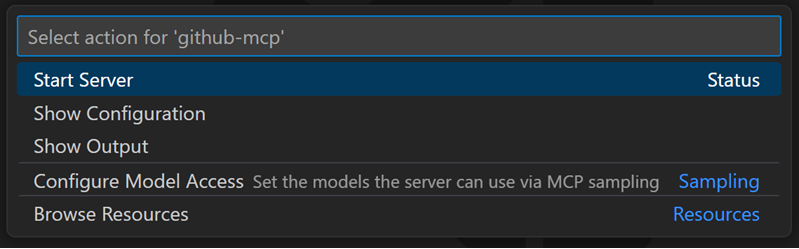 |
Edit an MCP server configuration
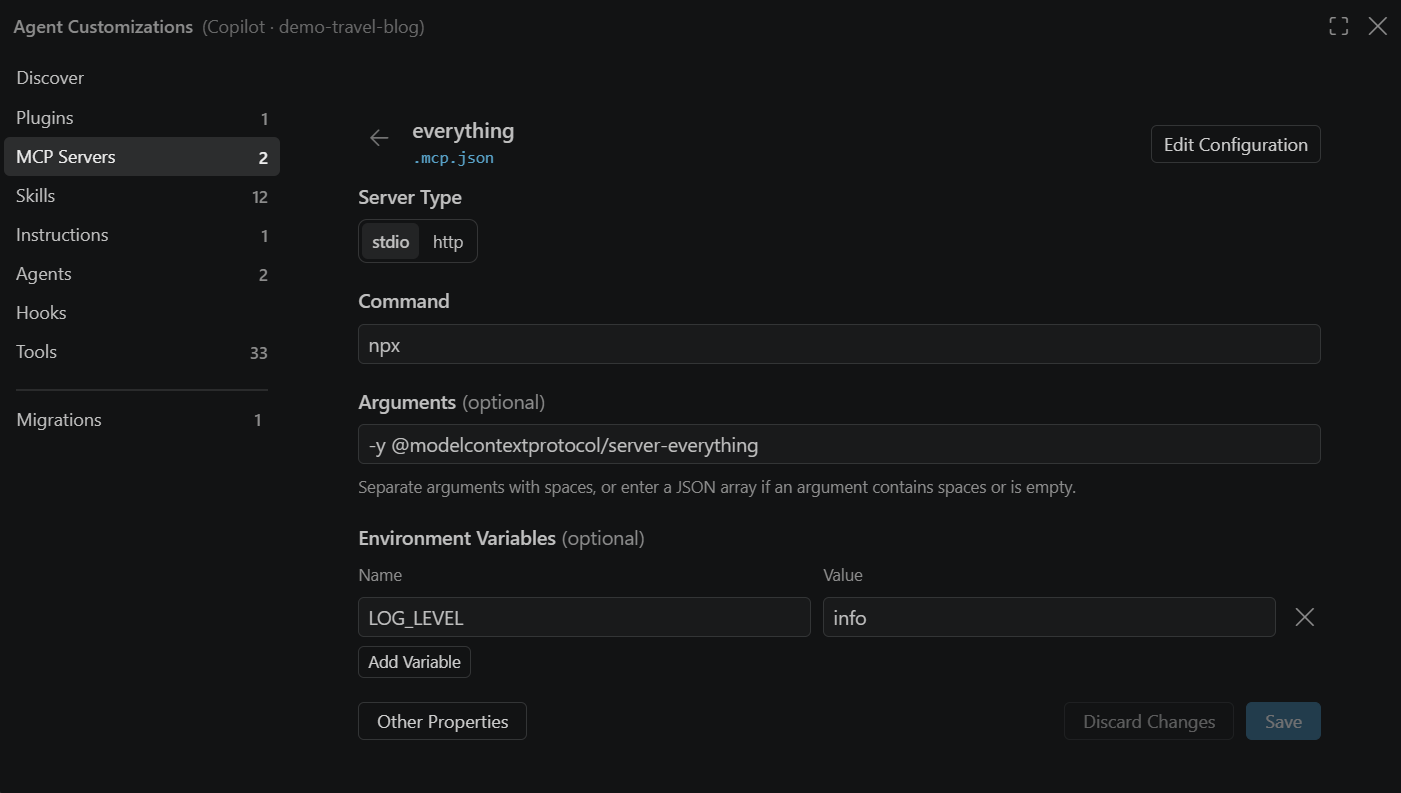
The Agent Customizations editor provides a form for MCP servers in workspace-root .mcp.json files and the Copilot user configuration at $COPILOT_HOME/mcp-config.json, with ~/.copilot/mcp-config.json as the fallback location.
To edit a server:
- Start a Copilot harness session by sending a request in the Chat view.
- Run Chat: Open Customizations from the Command Palette (⇧⌘P (Windows, Linux Ctrl+Shift+P)).
- Select MCP Servers, and then select the server that you want to edit.
- Change the server type or edit the available fields:
- For a standard I/O (stdio) server, edit the command, arguments, and environment variables.
- For a remote server, edit the URL and headers.
- Select Save. If a changed value isn't supported by the destination file, Save is unavailable and the form explains what to change.
Select Discard Changes to restore the saved values. Saving updates only the properties you changed and preserves other file content and properties that the form doesn't show, such as tools. Select Other Properties to open the server entry in the JSON file.
The available fields depend on the configuration source:
| Configuration source | Form support |
|---|---|
Workspace-root .mcp.json |
Supports stdio and HTTP servers. SSE, working directory, environment files, and VS Code input variables aren't supported. |
$COPILOT_HOME/mcp-config.json or ~/.copilot/mcp-config.json |
Supports stdio, HTTP, and SSE servers, including the working directory for stdio servers. Environment files and VS Code input variables aren't supported. |
Workspace .vscode/mcp.json or user-profile mcp.json |
Shows read-only JSON in the Agent Customizations editor. Open the source file to edit the configuration. |
For arguments, enter either space-separated values or a JSON array of strings. With focus in the form, press Alt+F1 (Option+F1 on macOS) to open Accessibility Help.
Enable or disable MCP servers
You can enable or disable an MCP server globally or for a specific workspace. When an MCP server is disabled, it does not start and its tools, prompts, resources, and MCP apps are excluded from chat.
To enable or disable an MCP server:
- Right-click a server in the MCP SERVERS - INSTALLED section of the Extensions view and select Enable or Disable.
- Run MCP: List Servers from the Command Palette, select a server, and choose Enable or Disable.
- Use the Agent Customizations editor to toggle the server's enabled state.
The enable/disable state is stored separately from the server configuration in mcp.json, so it does not affect shared configuration files.
Other MCP capabilities
Beyond tools, MCP servers can provide other capabilities:
| Capability | Description | How to use |
|---|---|---|
| Resources | Access data from MCP servers as context in your prompts, such as files, database tables, or API responses. Resources provide read-only context that you attach to a chat request. | In the Chat view, select Add Context > MCP Resources. You can also use the MCP: Browse Resources command. |
| Prompts | Use preconfigured prompt templates from MCP servers to standardize common tasks. Each MCP server can expose its own set of prompts tailored to its capabilities. | Type /<MCP server>.<prompt> in the chat input. |
| MCP Apps | Get interactive UI components like forms, visualizations, and drag-and-drop lists rendered directly in chat. MCP Apps enable richer interactions beyond text responses. Learn more in the MCP Apps blog post. | MCP Apps appear inline when an MCP server supports them. |
MCP server trust
Workspace MCP servers inherit Workspace Trust. When you trust a workspace, servers in .vscode/mcp.json and workspace-root .mcp.json can start without a separate MCP server trust prompt, including after their configuration changes. In restricted mode, workspace MCP configuration is blocked and these servers don't start.
Review workspace MCP configuration before you trust a repository because local MCP servers can run code on your machine.
MCP servers from other sources can use a separate trust decision. For these servers, VS Code shows a dialog when a server first starts or its configuration changes. In the dialog, select the link to the MCP server to review its configuration.
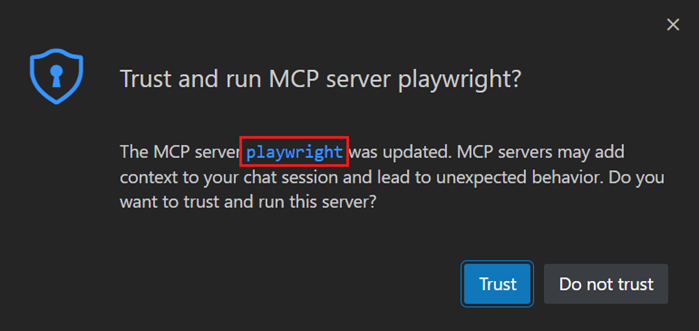
If you don't trust the MCP server, it will not be started, and chat requests will continue without using the tools provided by the server.
To reset separate MCP server trust decisions, run the MCP: Reset Trust command from the Command Palette. This command doesn't change Workspace Trust.
Sandbox MCP servers
On macOS and Linux, you can enable sandboxing for locally-running stdio MCP servers to restrict their access to the file system and network. Sandbox rules can deny file access, grant write access, and grant access to specific network domains.
This per-server sandbox is separate from sandboxing for Copilot harness sessions. When the Copilot harness sandbox is on, chat.agent.sandbox.mcpServers applies by default to the servers it manages and has its own configuration and scope.
To enable sandboxing for a server, set "sandboxEnabled": true in the server configuration in your mcp.json file. Add a sandbox object to the server to grant file system or network access and define server-specific restrictions. You can also add a top-level sandbox object with deny rules that apply to all sandboxed servers in the file.
The following example grants one server write access to the workspace and access to a specific API domain. The top-level rule prevents all sandboxed servers in the file from reading the .ssh directory:
{
  "servers": {
    "myServer": {
      "type": "stdio",
      "command": "npx",
      "args": ["-y", "@example/mcp-server"],
      "sandboxEnabled": true,
      "sandbox": {
        "filesystem": {
          "allowWrite": ["${workspaceFolder}"]
        },
        "network": {
          "allowedDomains": ["api.example.com"]
        }
      }
    }
  },
  "sandbox": {
    "filesystem": {
      "denyRead": ["${userHome}/.ssh"]
    }
  }
}
When sandboxing is enabled, tool calls from the server are auto-approved because they run in a controlled environment.
For the full sandbox configuration schema, see the Sandbox configuration reference.
Sandboxing is currently not available on Windows.
Centrally manage access to MCP servers in VS Code
Organizations can centrally manage access to MCP servers with Copilot enterprise-managed settings. Learn more about enterprise management of MCP servers.
Automatically start MCP servers
When you submit a chat message, VS Code can automatically start MCP servers so that their tools are available to the chat. Use the chat.mcp.autostart setting to control which servers VS Code starts during this autostart pass:
never: Don't automatically start MCP servers.onlyNew: Start servers that have never run.newAndOutdated(default): Start servers that have never run and servers whose configuration has changed.
Disabled servers and servers in an error state are excluded from the autostart pass.
Setting
chat.mcp.autostart
to never doesn't prevent a Copilot harness session from starting its configured MCP servers. This setting controls only the editor's MCP autostart pass. The Agent Host, the process that runs the session, manages its servers independently. For configuration locations and forwarding restrictions, see Configure the mcp.json file.
Synchronize MCP configuration across devices
With Settings Sync enabled, you can synchronize settings and configurations across devices, including MCP server configurations. This enables you to maintain a consistent development environment and access the same MCP servers on all your devices.
To synchronize MCP server configuration with Settings Sync:
-
Run the Settings Sync: Configure command from the Command Palette
-
Enable the MCP Servers option in the list of synchronized configurations
Troubleshoot and debug MCP servers
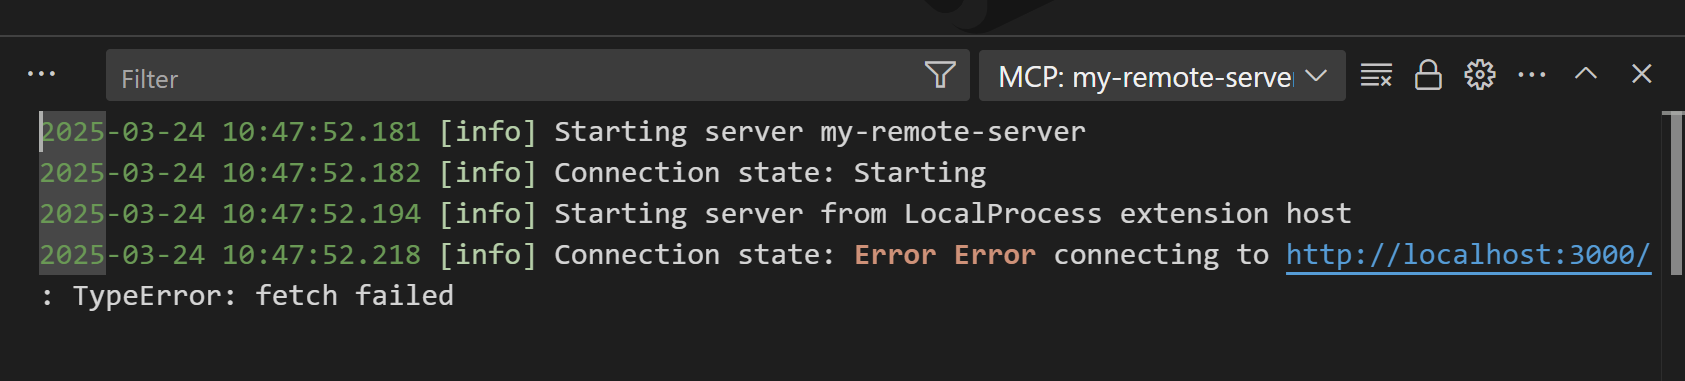
MCP output log
When VS Code encounters an issue with an MCP server, it shows an error indicator in the Chat view.
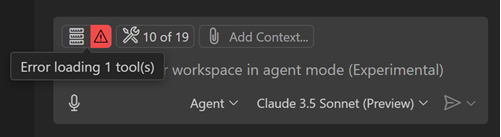
To view the logs from the Agent Customizations editor, open MCP Servers, select the server's ellipsis (...) menu, and then select Show Output. The editor closes and the Output view opens with the server's output channel selected.
You can also select the error notification in the Chat view and then select Show Output. Alternatively, run MCP: List Servers from the Command Palette, select the server, and then choose Show Output.
Frequently asked questions
The MCP server is not starting when using Docker
Verify that the command arguments are correct and that the container is not running in detached mode (-d option). You can also check the MCP server output for any error messages (see Troubleshooting).