GitHub Copilot coding agent
GitHub Copilot coding agent is a GitHub-hosted, autonomous AI developer that works independently in the background to complete development tasks. To invoke the coding agent, assign a GitHub issue to Copilot or delegate a task from chat, and the agent will work autonomously to implement features, fix bugs, and make changes across your repository using its own isolated development environment.
This is different from using agents in VS Code, which provide interactive development within the editor and requires your active participation during the coding session.
How it works
The Copilot coding agent workflow:
- Assignment: You assign a GitHub issue to
@copilot, delegate a task from VS Code chat, or use TODO code actions - Analysis: The agent analyzes the task and your repository structure
- Development: Copilot works in its own isolated GitHub Actions environment where it can:
- Explore your codebase
- Make changes across multiple files
- Run builds and tests
- Execute linters and other automated checks
- Pull request: The agent creates a pull request with the implementation
- Review: You review the changes and can request modifications through PR comments
- Iteration: The agent responds to feedback and updates the implementation
Prerequisites
Before you can use Copilot coding agent, you need:
- GitHub Copilot subscription: Available with Copilot Pro, Pro+, Business, or Enterprise plans
- Write access: You must have write permissions to the repository
- Enable the agent: Copilot coding agent must be enabled for your account or organization
- VS Code setup: Install the GitHub Pull Requests extension
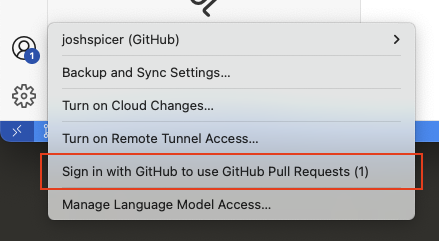
Ensure you are signed into the GitHub Pull Request extension with the correct GitHub account.
Optional: Enable the experimental setting githubPullRequests.codingAgent.uiIntegration to show a Delegate to coding agent button in Copilot Chat for easier task delegation.
You can also manage coding agent sessions from a dedicated chat editor and view a Chat Sessions view by enabling the experimental setting chat.agentSessionsViewLocation.
If you don't have Copilot access yet, you can sign up for the Copilot Free plan to get a monthly limit of interactions.
Assign work to Copilot coding agent in VS Code
Method 1: Assign issues to Copilot
You can trigger Copilot coding agent by assigning a GitHub issue to Copilot, similar to how you assign an issue to a team member. Copilot coding agent automatically analyzes the issue and starts working on it.
-
In the GitHub Pull Requests view, navigate to the Issues section
-
Find the issue you want to assign to Copilot
-
Right-click the issue and select Assign to Copilot or select Assign and then select
@copilotTipYou can also assign issues to
@copilotdirectly on GitHub.com. The coding agent will work the same way, creating a pull request that you can then review in VS Code or on GitHub. -
The agent will begin working on the issue in the background
-
Open the Chat view in VS Code (⌃⌘I (Windows, Linux Ctrl+Alt+I))

Method 2: Delegate from chat
You can also hand off work to Copilot coding agent directly from your chat conversation. Instead of having the agent implement changes immediately in your editor, you can delegate the task to the coding agent to work on it autonomously in the background.
-
Open the Chat view in VS Code (⌃⌘I (Windows, Linux Ctrl+Alt+I))
-
Have a conversation about the feature or change you want to implement
-
When ready, delegate to the agent by using one of these methods:
Use the delegate button (Experimental)
Enable the experimental setting githubPullRequests.codingAgent.uiIntegration to show a Delegate to coding agent button in the Chat view for repositories that have the agent enabled. Select this button to hand off your current chat context to the coding agent.
When you delegate a task, additional context including file references are forwarded to the coding agent, enabling you to precisely plan out a task for the coding agent to complete. A new chat editor opens with the coding agent's progress shown in real-time.
Use the #copilotCodingAgent tool
You can also reference the
#copilotCodingAgenttool directly in your prompt to ask Copilot to continue a local change in the background. This tool automatically pushes pending changes to a remote branch and initiates a coding agent session: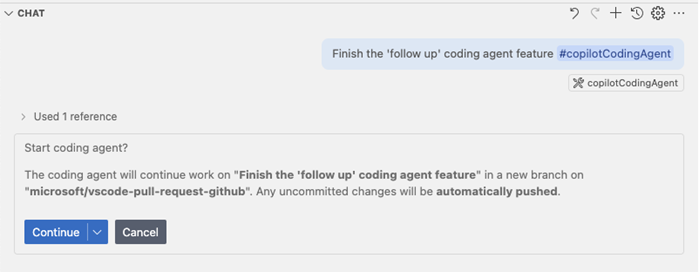
-
The agent will create a pull request and begin implementing the discussed changes. When you start a coding agent session (via
#copilotCodingAgentor with the Delegate to coding agent action), the pull request is rendered as a card in the Chat view.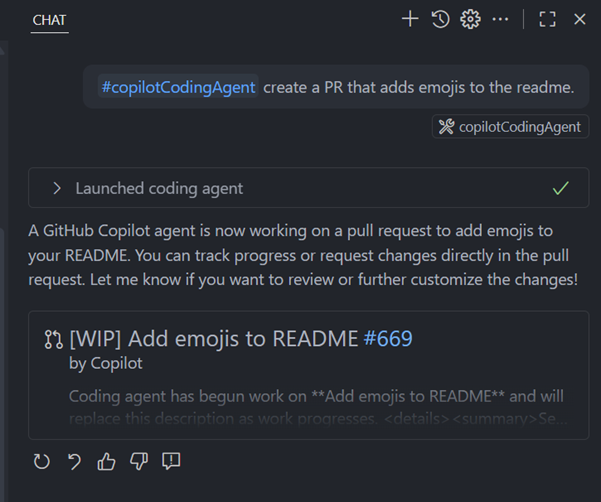
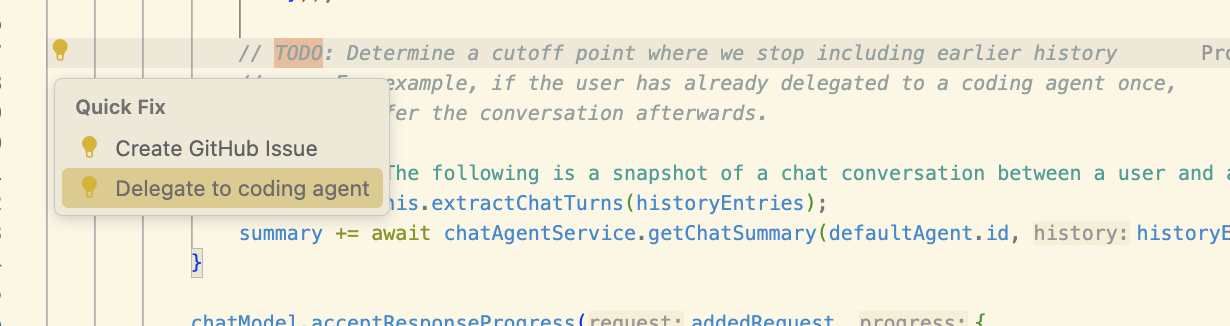
Method 3: Fix TODOs with coding agent
Comments starting with TODO in your code now show a Code Action to quickly initiate a coding agent session. This provides a convenient way to delegate specific tasks directly from your code.
The TODO keyword is configurable via the githubIssues.createIssueTriggers setting. You can customize which comment keywords trigger the coding agent code action.
-
Navigate to a
TODOcomment in your code -
Look for the light bulb icon or use ⌘. (Windows, Linux Ctrl+.) to open the Quick Fix menu
-
Select Delegate to coding agent from the available code actions
-
The coding agent will analyze the TODO comment and implement the requested changes in a new pull request
Track agent progress
Understanding the coding agent workflow
When you assign work to Copilot coding agent, it follows a specific workflow that may differ from your expectations:
-
Initial pull request creation: The agent immediately creates a pull request with an initial empty commit. This establishes the workspace and branch where all changes will be made.
-
Background processing: The coding agent works in GitHub's cloud infrastructure (GitHub Actions environment), not on your local machine. This means:
- All development happens remotely on GitHub's servers
- The agent has access to the full repository context
- Work continues even when you close VS Code
-
Incremental updates: After the initial commit, the agent will push additional commits with the actual code changes as it develops the solution.
If you see an initial commit with no changes, this is expected behavior. The agent will continue to push actual code changes in subsequent commits as it works on your task.
Monitor work in VS Code
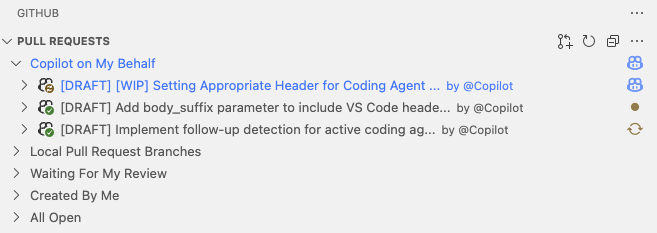
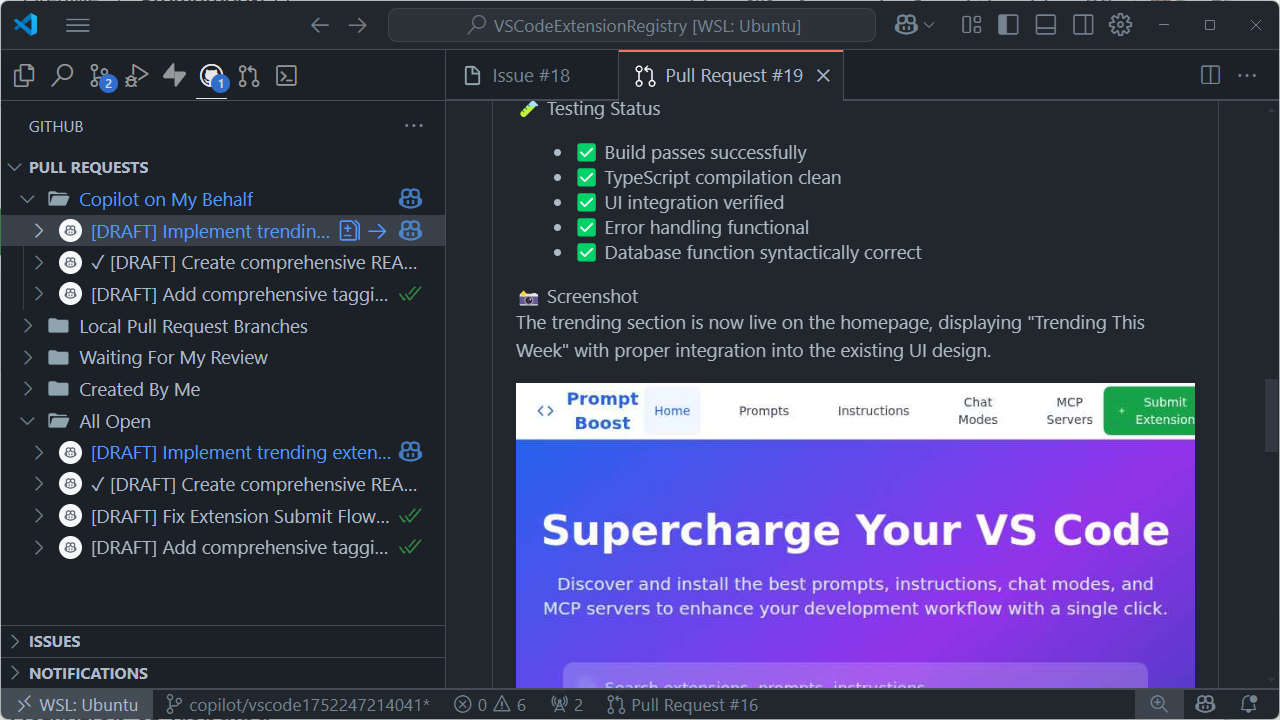
The GitHub Pull Requests extension provides a dedicated Copilot on My Behalf section that shows:
- All active Copilot coding agent sessions
- Pull requests created by the agent
- Progress status for each task
- Numeric badges indicating new changes or updates
You can also monitor work that you assigned to @copilot through GitHub.com - all active sessions and pull requests will appear in this section regardless of where you initiated them.
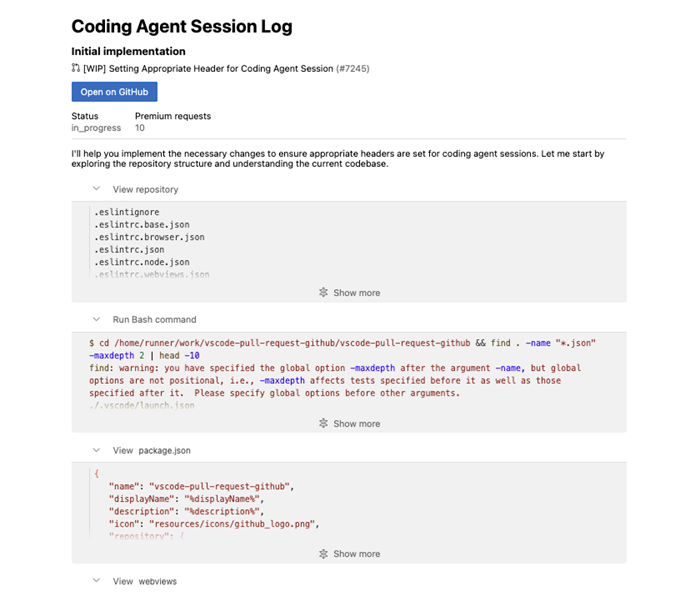
View detailed session logs
-
In the Pull Requests view, find your agent's work under Copilot on My Behalf
-
Select View Session to see a detailed log of everything the agent did:
- Commands executed
- Files modified
- Tests run
- Decision-making process
Manage sessions with dedicated chat editor (Experimental)
You can manage coding agent sessions from a dedicated chat editor that enables you to:
- Follow the progress of the coding agent in real-time
- Provide follow-up instructions directly from chat
- See the agent's responses in a dedicated environment
- View or apply code changes and check out pull requests directly from the chat editor
- Experience seamless transitions from local chats to GitHub agent tasks with improved continuity
- Benefit from better session rendering with improved visual clarity
- Enjoy faster session loading for a more responsive experience
Enable the experimental setting chat.agentSessionsViewLocation to try this feature:
-
When set to
view, you'll see a Chat Sessions view in the VS Code Side Bar for managing local and coding agent sessions. The view now includes rich descriptions with detailed context to help you quickly find relevant information.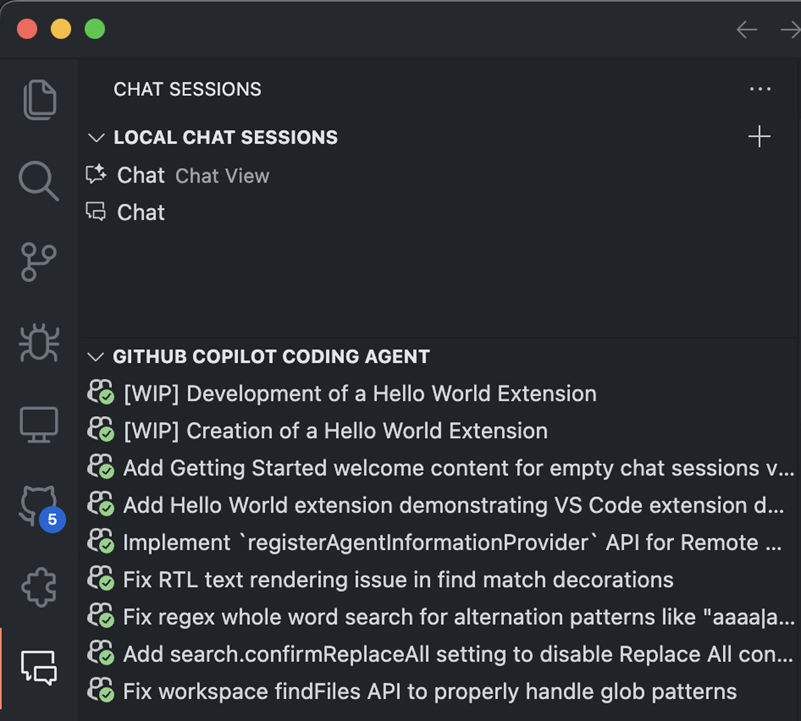
-
When set to
showChatsMenu, coding agent sessions appear alongside local chat history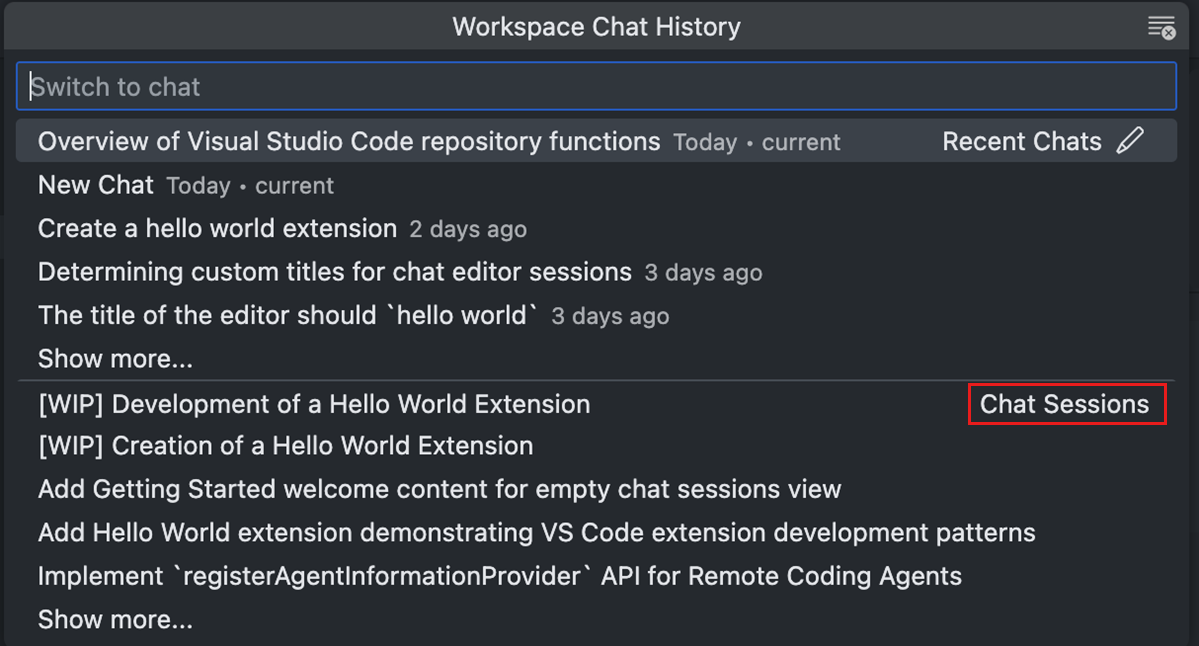
Pull requests created by the coding agent are also rendered as cards in the Chat view when you start a session, providing better visual integration.
Improved delegation experience
The delegation experience from VS Code to GitHub coding agent has been significantly enhanced in recent updates:
- Better context forwarding: When you delegate a task from chat, additional context including file references are automatically forwarded to the GitHub coding agent
- Real-time progress: New chat editor opens showing the coding agent's progress in real-time
- Seamless transitions: Improved continuity when moving from local chats to GitHub agent tasks
- Enhanced visual integration: Pull requests are rendered as interactive cards in the Chat view for better navigation
These improvements make it easier to precisely plan out tasks for the coding agent and monitor their progress without leaving VS Code.
Cancel a running session
If you need to stop the agent, you can stay in VS Code and use the Cancel coding agent button on the PR overview page.
You can also cancel a session from GitHub.com:
- Go to your GitHub repository on GitHub.com
- Navigate to the Actions tab
- Find the running Copilot Coding Agent workflow
- Select Cancel workflow
Review and iterate
Work completion
After the Copilot coding agent has analyzed your code and determined the changes that are needed to accomplish the task, it performs the following steps:
- Create a pull request with all changes
- Assign the PR to you for review
- Request you as a reviewer
- Include a detailed description explaining the implementation
- Add screenshots when applicable (for UI changes)
Provide feedback
You can guide the agent's work through pull request comments. Make sure to tag @copilot in your comments so the agent will respond:
-
Request changes: Leave specific feedback about what needs to be modified
@copilot Please update the login form to include password strength validation -
Request improvements: Ask for additional features or refinements
@copilot Can you add error handling for network timeouts?
The agent will respond to your feedback, make the requested changes, and update the pull request.
When working with pull requests created by the coding agent, the #activePullRequest tool is automatically enabled for your chat session. This gives chat context about your PR, including what files were changed, who's assigned, and the state (draft or ready for review). You can then ask about this PR and iterate further on it in chat.
Frequently asked questions
What's the difference between Copilot coding agent and using agents?
VS Code offers two autonomous coding experiences. While using agents in VS Code provides interactive development directly within the editor, the Copilot coding agent works independently on GitHub to implement features in the background.
| Feature | Copilot coding agent | Using agents |
|---|---|---|
| Where it runs | GitHub cloud | Your VS Code editor |
| Independence | Fully autonomous | Involves user interaction and iteration |
| Output | Creates pull requests | Edits files directly |
| Best for | Well-defined tasks, background work | Interactive development, immediate feedback |
Learn more about using agents in VS Code.
Why isn't the agent starting?
- Verify Copilot access on your GitHub account
- Ensure you have write permissions to the repository
- Check that Copilot coding agent is enabled for your organization
Why does the initial commit appear empty?
When Copilot coding agent starts working, it creates an initial empty commit to establish the pull request and working branch. This is expected behavior - the agent will push subsequent commits with actual code changes as it works in GitHub's cloud environment.
You can monitor progress through the session logs accessible from the pull request, the GitHub Pull Request extension's Copilot on My Behalf section, or the Chat Sessions view.
Why are implementations incomplete?
- Review the session logs for any errors encountered
- Check if tests failed during the agent's work
- Provide more detailed requirements in your issue description
What security protections does Copilot coding agent have?
Copilot coding agent includes built-in security protections and operates within GitHub's security framework. For detailed information about security measures, permissions, and branch protection compatibility, see the GitHub Copilot coding agent security documentation.
Can I extend Copilot coding agent with external tools?
For advanced scenarios, you can extend Copilot coding agent with Model Context Protocol (MCP) servers to give it access to:
- External databases
- Cloud services
- APIs and third-party integrations
- Custom development tools
Learn more about extending Copilot coding agent with MCP.
What are the current limitations?
- Cross-repository changes: Can only work within the repository where the issue is assigned
- Multiple PRs per task: Opens exactly one pull request per assigned task
- Existing PR modifications: Cannot work on pull requests it didn't create
For detailed information about limitations, compatibility, and usage costs, see the GitHub Copilot Coding Agent documentation.
Next steps
- Enable Copilot coding agent by following the GitHub setup guide
- Try agents in VS Code chat for immediate, interactive coding assistance