C# Quick Actions and Refactorings
Visual Studio Code gives you many ways to refactor your source code as well as Quick Fixes to generate code and fix issues while you're coding. To access them, click on the 'light bulb' icon that appears or use the command Quick Fix command ⌘. (Windows, Linux Ctrl+.) to display a list of Quick Fixes and refactoring options. You can also right-click the editor and select Refactor ⌃⇧R (Windows, Linux Ctrl+Shift+R) to only display refactoring options.
Supported refactorings and Quick Fixes
- Add
await - Add constructor parameters from members
- Add
DebuggerDisplayattribute - Add explicit cast
- Add file header
- Add missing
usings/ imports - Add named argument
- Convert anonymous type to class
- Convert between auto property and full property
- Convert between direct cast and
asexpression - Convert between
forloop andforeachstatement - Convert between Get method and property
- Convert between
ifandswitchstatements - Convert between regular string and verbatim string
- Convert class to record
- Convert local function to method
- Convert numeric literal to hex, decimal, or binary number
- Convert placeholder to interpolated string
- Convert regular string to interpolated string
- Convert tuple to struct
- Encapsulate field
- Generate comparison operators
- Generate default constructors
- Generate parameter
- Implement all members explicitly
- Implement all members implicitly
- Inline method
- Inline temporary variable
- Introduce local variable for expression
- Introduce parameter
- Introduce
usingstatement - Invert conditional expressions and logical operations
- Invert
if - Make member static
- Move declaration near reference
- Move type to matching file
- Reverse
forstatement - Split or merge
ifstatements - Use explicit type
- Use implicit type
- Use lambda expression or block body
- Use recursive patterns
- Wrap, indent, and align refactorings
Add await
What: Adds await keyword to a function call.
When: When you're calling a function within an asynchronous method.
How-to:
- Place carat by the function call (will most likely be underlined in red).
- Press ⌘. (Windows, Linux Ctrl+.)to trigger the Quick Actions and Refactorings menu.
- Select Add
await.

Add constructor parameters from members
What: Generate a new constructor with parameters based on selected class members.
When: You introduce a new constructor and want to properly declare it automatically with all the correct parameters.
Why: You could declare the constructor before using it, however this feature generates it automatically.
How-to:
- Highlight the class members you want to add as parameters in the constructor.
- Press ⌘. (Windows, Linux Ctrl+.)to trigger the Quick Actions and Refactorings menu.
- Select Generate constructor <classname>(<membertype>, <membertype>, <etc.>).

Add DebuggerDisplay attribute
What: The DebuggerDisplay Attribute controls how an object, property, or field is displayed in the debugger variable windows.
When: You want to pin properties within the debugger programmatically in your code.
Why: Pinning properties allows you to quickly inspect objects by their properties by bubbling up that property to the top of the object's property list within the debugger.
How-to:
- Place your cursor on either a type, delegate, property, or field.
- Press ⌘. (Windows, Linux Ctrl+.)to trigger the Quick Actions and Refactorings menu and select Add
DebuggerDisplayattribute. - The
DebuggerDisplayattribute is added along with an auto method that returns the defaultToString().

Add explicit cast
What: Lets you automatically add an explicit cast to an expression, based on usage.
When: You need to add an explicit cast to an expression and want to properly assign it automatically.
Why: You could add an explicit cast to an expression manually, however this feature adds it automatically based on the code context.
How-to:
- Place your caret on the error.
- Press ⌘. (Windows, Linux Ctrl+.)to trigger the Quick Actions and Refactorings menu.
- Select Add explicit cast.
Add file header
What: Add file headers to existing files, projects, and solutions using an EditorConfig.
When: You want to easily add a file header to files, projects, and solutions.
Why: Your team requires you to include a file header for copyright purposes.
How-to:
- Add an EditorConfig to a project or solution if you do not already have one.
- Add the following rule to your EditorConfig file:
file_header_template. - Set the value of the rule to equal the header text you would like applied. You can use
{fileName}as a placeholder for the file name. - Place your caret on the first line of any C# file.
- Press ⌘. (Windows, Linux Ctrl+.)to trigger the Quick Actions and Refactorings menu.
- Select Add file header.
Add missing usings / imports
What: Lets you immediately add the necessary imports or using directives for copy-and-pasted code.
When: It's common practice to copy code from different places in your project or other sources and paste it into new code. This Quick Action finds missing imports directives for copy-and-pasted code and then prompts you to add them. This code fix can also add references from project to project.
Why: Because the Quick Action automatically adds necessary imports, you don't need to manually copy the using directives that your code needs.
How-to:
- Copy code from a file and paste it into a new one without including the necessary using directives. The resulting error is accompanied by a code fix that adds the missing using directives.
- Select ⌘. (Windows, Linux Ctrl+.)to open the Quick Actions and Refactorings menu.
- Select Using <your reference> to add the missing reference.

Add named argument
What: Append a named argument to the specified parameter value in a function call.
When: If you have a method with a lot of parameters, you can add named arguments to make your code more readable.
How-to:
- Place your cursor in a parameter within your function call.
- Press ⌘. (Windows, Linux Ctrl+.)to trigger the Quick Actions and Refactorings menu.
- Select Add argument name <parameter name>.

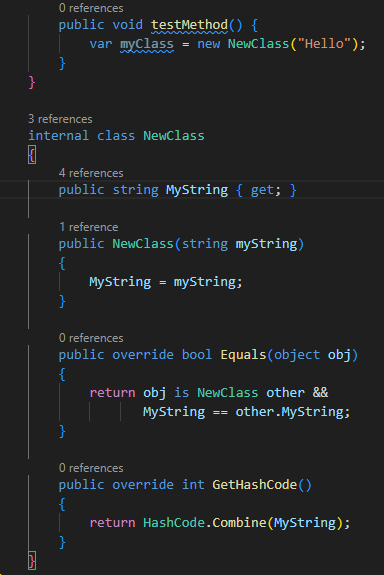
Convert anonymous type to class
What: Convert an anonymous type to class.
When: You have an anonymous type that you want to continue to build on in a class.
Why: Anonymous types are useful if you're only using them locally. As your code grows, it's nice to have an easy way to promote them to a class.
How-to:
- Place your cursor in an anonymous (
var) type. - Press ⌘. (Windows, Linux Ctrl+.)to trigger the Quick Actions and Refactorings menu.
- Select Convert to class.
Convert between auto property and full property
What: Convert between an auto-implemented property to a full property.
When: The logic of the property has changed.
Why: You can convert between an auto-implemented property to a full property manually, however this feature will automatically do the work for you.
How-to:
- Place your cursor on the property name.
- Press ⌘. (Windows, Linux Ctrl+.)to trigger the Quick Actions and Refactorings menu.
- Select from the following two options:
Select Convert to full property.

Select Use auto property.

Convert between direct cast and 'as' expression
What: Convert a variable between a regular cast and a try cast using the as keyword.
When: When you expect the cast to fail under certain scenarios (as) or if you never expect the cast to fail (direct cast).
How-to:
- Place your cursor on the variable.
- Press ⌘. (Windows, Linux Ctrl+.) to trigger the Quick Actions and Refactorings menu.
- Select from the following two options:
Select Change to cast.

Select Change to as expression.

Convert between for loop and foreach statement
What: If you have a for loop in your code, you can use this refactoring to convert it to a foreach statement.
Why: Reasons you might want to convert a for loop to a foreach statement include:
- You don't use the local loop variable inside the loop except as an index to access items.
- You want to simplify your code and reduce the likelihood of logic errors in the initializer, condition, and iterator sections.
Reasons you might want to convert a foreach statement to a for loop include:
- You want to use the local loop variable inside the loop for more than just accessing the item.
- You are iterating through a multi-dimensional array and you want more control over the array elements.
How-to:
- Place your caret in the
foreachorforkeyword. - Press ⌘. (Windows, Linux Ctrl+.)to trigger the Quick Actions and Refactorings menu.
- Select from the following two options:
Select Convert to for.

Select Convert to foreach.

Convert between Get method and property
Convert Get method to property
What: Lets you convert a Get method into a property (and optionally your Set method).
When: You have a Get method that does not contain any logic.
How-to:
- Place your cursor in your Get method name.
- Press ⌘. (Windows, Linux Ctrl+.)to trigger the Quick Actions and Refactorings menu.
- (Optional) If you have a Set method, you can also convert your Set method at this time. Select Replace <Get method or Set method name> with property.

Convert property to Get method
What: Lets you convert a property to a Get method
When: You have a property that involves more than immediately setting and getting a value
How-to:
- Place your cursor in your Get method name.
- Press ⌘. (Windows, Linux Ctrl+.)to trigger the Quick Actions and Refactorings menu.
- Select Replace <property name> with method.

Convert between if and switch statements
What: Convert an if statement to a switch statement or to the C# 8.0 switch expression.
When: You want to convert an if statement to a switch statement or a switch expression and vice versa.
Why: If you are using an if statement, this refactoring enables an easy transition to switch statements or switch expressions.
How-to:
- Place your cursor in the
ifkeyword. - Press ⌘. (Windows, Linux Ctrl+.)to trigger the Quick Actions and Refactorings menu.
- Select from the following options:
Select Convert to switch statement.

Select Convert to switch expression.

Select Convert to if statement.

Convert between regular string and verbatim string
What: Lets you convert between regular string and verbatim string literals.
When: You either want to save space or provide more clarity in your code.
Why: Converting a verbatim string literal to a regular string literal can help save space. Converting a regular string literal to a verbatim string literal can provide more clarity.
How-to:
- Place your caret on either the regular string or verbatim string literal:
- Press ⌘. (Windows, Linux Ctrl+.)to trigger the Quick Actions and Refactorings menu.
- Select from one of the following options:
Select Convert to regular string.
Select Convert to verbatim string.
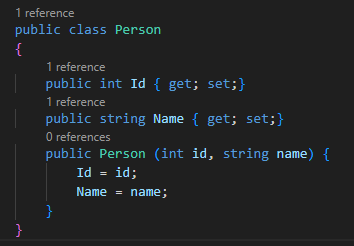
Convert class to record
What: Convert your class to a C# record.
When: When you want to quickly change your class to a record, which is tailored for storing data and immutability.
How-to:
- Place your cursor on the class name.
- Press ⌘. (Windows, Linux Ctrl+.)to trigger the Quick Actions and Refactorings menu.
- Select Convert to positional record.

Convert local function to method
What: Convert a local function to a method.
When: You have a local function that you want to define outside your current local context.
Why: You want to convert a local function into a method so that you can call it outside your local context. You might want to convert to a method when your local function is getting too long. When you define the function in a separate method, your code is easier to read.
How-to:
- Place your cursor in the local function.
- Press ⌘. (Windows, Linux Ctrl+.)to trigger the Quick Actions and Refactorings menu.
- Select Convert to method.

Convert numeric literal to hex, decimal, or binary number
What: Convert a number between a hexadecimal, binary, or decimal number.
When: Use when you want to automatically convert a number to the desired base without having to manually calculate the conversion.
How-to:
- Place your cursor on the numeric literal.
- Press ⌘. (Windows, Linux Ctrl+.)to trigger the Quick Actions and Refactorings menu.
- Select one of the following options:
Select Convert to decimal.

Select Convert to hex.

Select Convert to binary.

Convert placeholder to interpolated string
What: Convert a String.Format formatted result string (or placeholder) to an interpolated string.
When: Use when you want to an interpolated string quickly.
Why: Interpolated strings can give you a more readable version of String.Format and can let you access your variable name directly.
How-to:
- Place your cursor on the
String.Formatplaceholder. - Press ⌘. (Windows, Linux Ctrl+.)to trigger the Quick Actions and Refactorings menu.
- Select Convert to interpolated string.

Convert regular string to interpolated string
What: Change a regular string to an interpolated string.
When: Use when you want to clean up your code and make it more readable.
How-to:
- Place your cursor on the string you want to convert.
- Press ⌘. (Windows, Linux Ctrl+.)to trigger the Quick Actions and Refactorings menu.
- Select Convert to interpolated string.


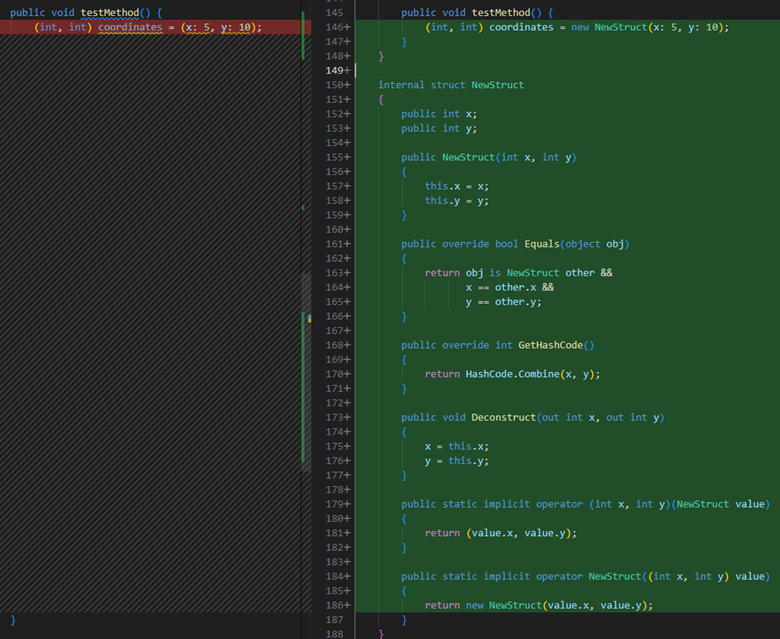
Convert tuple to struct
What: Convert your tuple to a struct
When: Use when want to quickly change your tuple to a struct and want to have fixed data you want to access multiple times.
How-to:
-
Place your cursor on the tuple.
-
Press ⌘. (Windows, Linux Ctrl+.)to trigger the Quick Actions and Refactorings menu.
-
Select one of the following options:
- Select Convert to
struct-> updating usages in containing member - Select Convert to
struct-> updating usages in containing type - Select Convert to
struct-> updating usages in containing project - Select Convert to
struct-> updating usages in dependent projects
- Select Convert to

Encapsulate field
What: Lets you turn a field into a property, and update all usages of that field to use the newly created property.
When: You want to move a field into a property, and update all references to that field.
Why: You want to give other classes access to a field, but don't want those classes to have direct access. By wrapping the field in a property, you could write code to verify the value being assigned, for example.
How-to:
- Place your cursor inside the name of the field to encapsulate.
- Press ⌘. (Windows, Linux Ctrl+.)to trigger the Quick Actions and Refactorings menu.
- Select one of the following:
Select Encapsulate field: <fieldname> (and use property).

Select Encapsulate field: <fieldname> (but still use field).

Generate comparison operators
What: Lets you generate Comparison operators for types that implement IComparable.
When: You have a type that implements IComparable we will automatically add the comparison operators.
Why: If you are implementing a value type, you should consider overriding the Equals method to gain increased performance over the default implementation of the Equals method on ValueType.
How-to:
- Place your cursor either inside the class or on the IComparable keyword.
- Press ⌘. (Windows, Linux Ctrl+.)to trigger the Quick Actions and Refactorings menu.
- Select Generate comparison operators from the drop-down menu.
Generate default constructors
What: Lets you immediately generate the code for a new default constructor on a class.
When: You introduce a new default constructor and want to properly declare it automatically.
Why: You could declare the constructor before using it, however this feature generates it automatically.
How-to:
- Place your cursor on the class name.
- Press ⌘. (Windows, Linux Ctrl+.)to trigger the Quick Actions and Refactorings menu.
- Select Generate constructor <classname>().

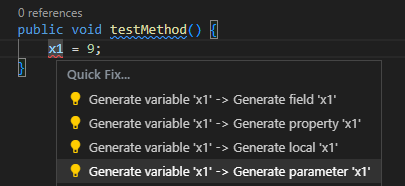
Generate parameter
What: Automatically generates a method parameter.
When: You reference a variable in a method that doesn't exist in the current context and receive an error; you can generate a parameter as a code fix.
Why: You can quickly modify a method signature without losing context.
How-to:
- Place your cursor in the variable name.
- Press ⌘. (Windows, Linux Ctrl+.) to trigger the Quick Actions and Refactorings menu.
- Select Generate parameter.
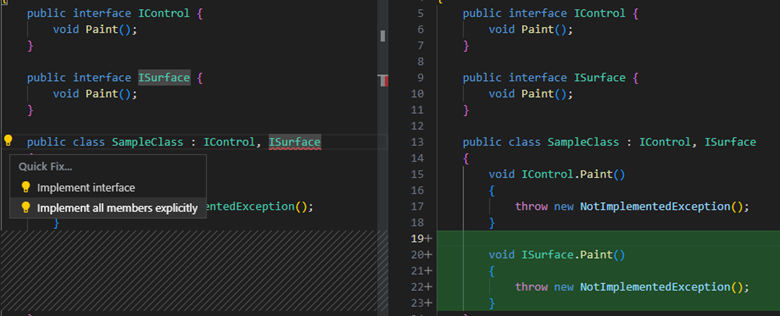
Implement all members explicitly
What: Define your interface's methods explicitly in a class. An explicit interface implementation is a class member that is only called through the specified interface.
When: Use when:
- You don't want the same implementation to be called for multiple interfaces.
- You want to resolve cases where two interfaces each declare different members of the same name such as a property and a method.
How-to:
- Place your cursor on an interface being implemented in a class.
- Press ⌘. (Windows, Linux Ctrl+.)to trigger the Quick Actions and Refactorings menu.
- Select Implement all members explicitly:
Implement all members implicitly
What: Define your interface's methods implicitly in a class. An implicit interface implementation is when an interface's methods and properties are directly added to the class as public methods.
How-to:
- Place your cursor on an interface being implemented in a class.
- Press ⌘. (Windows, Linux Ctrl+.)to trigger the Quick Actions and Refactorings menu.
- Select Implement interface:

Inline method
What: Inline method refactoring.
When: You want to replace usages of a static, instance, and extension method within a single statement body with an option to remove the original method declaration.
Why: This refactoring provides a clearer syntax.
How-to:
- Place your caret on the usage of the method.
- Press ⌘. (Windows, Linux Ctrl+.)to trigger the Quick Actions and Refactorings menu.
- Select from one of the following options:
Select Inline <QualifiedMethodName> to remove the inline method declaration:

Select Inline and keep <QualifiedMethodName> to preserve the original method declaration:

Inline temporary variable
What: Lets you remove a temporary variable and replace it with its value instead.
When: The use of the temporary variable makes the code harder to understand.
Why: Removing a temporary variable may make the code easier to read.
How-to:
- Place your cursor inside the temporary variable to be inlined.
- Press ⌘. (Windows, Linux Ctrl+.)to trigger the Quick Actions and Refactorings menu.
- Select Inline temporary variable.

Introduce local variable for expression
What: Lets you immediately generate a local variable to replace an existing expression.
When: You have code that could be easily reused later if it were in a local variable.
Why: You could copy and paste the code multiple times to use it in various locations, however it would be better to perform the operation once, store the result in a local variable, and use the local variable throughout.
How-to:
- Place your caret on the expression that you want to assign to a new local variable.
- Press ⌘. (Windows, Linux Ctrl+.)to trigger the Quick Actions and Refactorings menu.
- Select from the following options:
Select Introduce local -> Introduce local for <expression>

Select Introduce local -> Introduce local for all occurrences of <expression>
Introduce parameter
What: Lets you immediately generate a new parameter to replace an existing expression.
When: You have code that could be easily reused later if it were in a parameter.
Why: You could copy and paste the code multiple times to use it in various locations, however it would be better to perform the operation once, store the result in a parameter, and use the parameter throughout.
How-to:
- Place your caret on the expression that you want to assign to a new parameter.
- Press ⌘. (Windows, Linux Ctrl+.)to trigger the Quick Actions and Refactorings menu.
- Select from the following options:
Select Introduce parameter for <expression> -> and update call sites directly

Select Introduce parameter for <expression> -> into extracted method

Select Introduce parameter for <expression> -> into new overload

Introduce using statement
What: Add a using statement / code block to your IDisposable instance.
When: You have an IDisposable instance that you want to ensure is acquired, used, and disposed correctly.
How-to:
- Place your caret on the expression that you want to assign to a new parameter.
- Press ⌘. (Windows, Linux Ctrl+.)to trigger the Quick Actions and Refactorings menu.
- Select Introduce
usingstatement.

Invert conditional expressions and logical operations
What: Lets you invert a conditional expression or a conditional and \ or operator.
When: You have a conditional expression or conditional and \ or operator that would be better understood if inverted.
Why: Inverting an expression or conditional and \ or operator by hand can take much longer and possibly introduce errors. This code fix helps you do this refactoring automatically.
How-to:
- Place your cursor in a conditional expression or a conditional
and\oroperator. - Press ⌘. (Windows, Linux Ctrl+.)to trigger the Quick Actions and Refactorings menu.
- Select Invert conditional or Replace
&&with||


Invert if
What: Lets you invert an if or if else statement without changing the meaning of the code.
When: When you have an if or if else statement that would be better understood when inverted.
Why: Inverting an if or if else statement by hand can take much longer and possibly introduce errors. This code fix helps you do this refactoring automatically.
How-to:
- Place your cursor in an
iforif elsestatement. - Press ⌘. (Windows, Linux Ctrl+.)to trigger the Quick Actions and Refactorings menu.
- Select Invert
if.

Make member static
What: Make a member static.
When: You want a non-static member to be static.
Why: Static members improve readability: knowing that specific code is isolated makes it easier to understand, reread, and reuse.
How-to:
- Place your caret on the member name.
- Press ⌘. (Windows, Linux Ctrl+.)to trigger the Quick Actions and Refactorings menu.
- Select Make static.

Move declaration near reference
What: Lets you move variable declarations closer to their usage.
When: You have variable declarations that can be in a narrower scope.
Why: You could leave it as it is, but that may cause readability issues or information hiding. This is a chance to refactor to improve readability.
How-to:
- Place your cursor in the variable declaration.
- Press ⌘. (Windows, Linux Ctrl+.)to trigger the Quick Actions and Refactorings menu.
- Select Move declaration near reference.

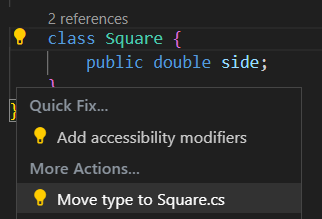
Move type to matching file
What: Lets you move the selected type to a separate file with the same name.
When: You have multiple classes, structs, interfaces, etc. in the same file that you want to separate.
Why: Placing multiple types in the same file can make it difficult to find these types. By moving types to files with the same name, code becomes more readable and easier to navigate.
How-to:
- Place the cursor inside the name of the type where it is defined.
- Press ⌘. (Windows, Linux Ctrl+.)to trigger the Quick Actions and Refactorings menu.
- Select Move type to <typename>.cs.
Reverse for statement
What: Lets you invert a for statement.
When: Use when you want to reverse the meaning of a for statement and how it iterates.
Why: Inverting a for statement by hand can take much longer and possibly introduce errors. This code fix helps you do this refactoring automatically.
How-to:
- Place your cursor in the
forstatement. - Press ⌘. (Windows, Linux Ctrl+.)to trigger the Quick Actions and Refactorings menu.
- Select Reverse
forstatement.

Split or merge if statements
What: Split or merge if statements.
When: You want to split an if statement that uses the && or || operators into a nested if statement, or merge an if statement with an outer if statement.
Why: It's a matter of style preference.
How-to:
If you want to split the if statement:
- Place your cursor in the
ifstatement by the&&or||operator. - Press ⌘. (Windows, Linux Ctrl+.)to trigger the Quick Actions and Refactorings menu.
- Select Split into nested
ifstatements.

If you want to merge the inner if statement with the outer if statement:
- Place your cursor in the inner
ifkeyword. - Press ⌘. (Windows, Linux Ctrl+.)to trigger the Quick Actions and Refactorings menu.
- Select Merge with nested
ifstatement.

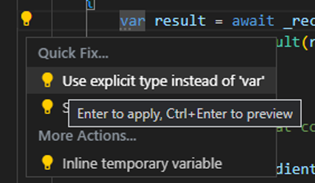
Use explicit type
What: Use this refactoring to replace var in a local variable declaration with an explicit type.
Why: To improve the code's readability or when you don't want to initialize the variable in the declaration.
However, var must be used when a variable is initialized with an anonymous type and the properties of the object are accessed at a later point. For more information, see Implicitly typed local variables (C#).
How-to:
- Place the caret on the
varkeyword. - Press ⌘. (Windows, Linux Ctrl+.)to trigger the Quick Actions and Refactorings menu.
- Select Use explicit type instead of
var.
Use implicit type
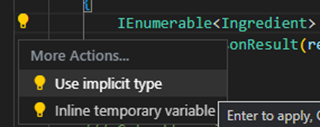
What: Use this refactoring to replace an explicit type in a local variable declaration with var.
Why: To fit your personal coding conventions and to have less code displayed. Var must be used when a variable is initialized with an anonymous type and the properties of the object are accessed at a later point. For more information, see Implicitly typed local variables (C#).
How-to:
- Place the caret on the explicit type keyword.
- Press ⌘. (Windows, Linux Ctrl+.)to trigger the Quick Actions and Refactorings menu.
- Select Use implicit type.
Use lambda expression or block body
What: Lets you refactor a lambda expression to use an expression body or a block body.
When: You prefer lambda expressions to use either an expression body or a block body.
Why: Lambda expressions can be refactored to improve readability according to your user preference.
How-to:
- Place your cursor on the right of a lambda operator.
- Press ⌘. (Windows, Linux Ctrl+.)to trigger the Quick Actions and Refactorings menu.
- Select one of the following:
Select Use block body for lambda expressions.

Select Use expression body for lambda expressions.

Use recursive patterns
What: Converts a code block to using a recursive pattern. This refactoring works with switch statements, property pattern matching, tuple pattern matching, and positional pattern matching.
When: Using recursive patterns can make your code more readable / cleaner.
How-to:
- Place your cursor on the expression you want to convert to a recursive pattern.
- Press ⌘. (Windows, Linux Ctrl+.)to trigger the Quick Actions and Refactorings menu.
- Select one of the following:
Select Convert switch statement to expression.
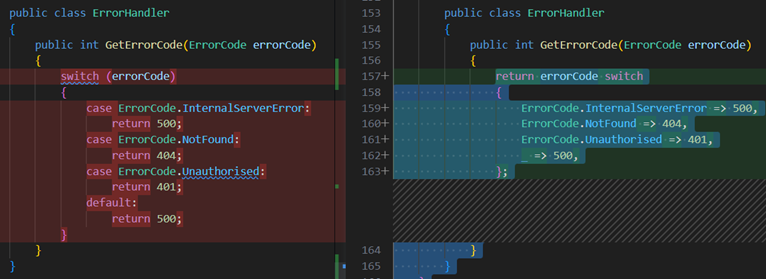
Select Use recursive patterns.


Wrap, indent, and align refactorings
Wrap and align call chains
What: Lets you wrap and align chains of method calls.
When: You have a long chain consisting of several method calls in one statement.
Why: Reading a long list is easier when they're wrapped or indented according to user preference.
How-to:
- Place your cursor in any of the call chains.
- Press ⌘. (Windows, Linux Ctrl+.)to trigger the Quick Actions and Refactorings menu.
- Select Wrap call chain or Wrap and align call chain to accept the refactoring.

Wrap, indent, and align parameters or arguments
What: Lets you wrap, indent, and align parameters or arguments.
When: You have a method declaration or call that has multiple parameters or arguments.
Why: Reading a long list of parameters or arguments is easier when they're wrapped or indented according to user preference.
How-to:
- Place your cursor in a parameter list.
- Press ⌘. (Windows, Linux Ctrl+.)to trigger the Quick Actions and Refactorings menu.
- Select from the following options:
Select Wrap every parameter -> Align wrapped parameters

Select Wrap every parameter -> Indent all parameters

Select Wrap every parameter -> Indent wrapped parameters

Wrap binary expressions
What: Lets you wrap binary expressions.
When: You have a binary expression.
Why: Reading a binary expression is easier when it is wrapped to user preference.
How-to:
- Place your cursor in the binary expression.
- Press ⌘. (Windows, Linux Ctrl+.)to trigger the Quick Actions and Refactorings menu.
- Select Wrap expression to accept the refactoring.
