Customize AI in Visual Studio Code
AI models have broad general knowledge but don't know your codebase or team practices. Think of the AI as a skilled new team member: it writes great code, but doesn't know your conventions, architecture decisions, or preferred libraries. Customization is how you share that context, so responses match your coding standards, project structure, and workflows.
This article covers the customization options in VS Code: custom instructions, prompt files, custom agents, agent skills, MCP servers, agent plugins, and language models.
Quick reference
| Goal | Use | When it activates |
|---|---|---|
| Apply coding standards everywhere | Always-on instructions | Automatically included in every request |
| Different rules for different file types | File-based instructions | When files match a pattern or description |
| Reusable task I run repeatedly | Prompt files | When you invoke a slash command |
| Package multi-step workflow with scripts | Agent skills | When the task matches the skill description |
| Specialized AI persona with tool restrictions | Custom agents | When you select it or another agent delegates to it |
| Connect to external APIs or databases | MCP | When the task matches a tool description |
| Automate tasks at agent lifecycle points | Hooks | When the agent reaches a matching lifecycle event |
| Install pre-packaged customizations from marketplaces | Agent plugins (Preview) | When you install a plugin |
Prompt files vs custom agents: Prompt files are best for single, repeatable tasks invoked as slash commands (for example, scaffolding a component). Custom agents are persistent personas that control which tools are available and can orchestrate subagents for multi-step workflows.
Custom instructions
Custom instructions enable you to define common guidelines and rules that automatically influence how AI generates code and handles other development tasks. Instead of manually including context in every chat prompt, specify custom instructions in a Markdown file to ensure consistent AI responses that align with your coding practices and project requirements.
VS Code supports two type of custom instructions:
- Always-on instructions: automatically applied to every chat session.
- File-based instructions: applied based on file path patterns or based on the instruction description
Use custom instructions to:
- Document how to work with your code, such as coding standards, preferred technologies, or project requirements
- Provide project-wide context that helps the AI understand the project's goal, architecture, and file structure
- Specify task-specific guidelines, such as how to write tests, documentation, or perform code reviews
Agent Skills
Agent Skills enable you to give the AI specialized capabilities and workflows through folders containing instructions, scripts, and resources. These skills are loaded on-demand based on the task at hand. Agent Skills is an open standard that works across multiple AI agents, including VS Code, GitHub Copilot CLI, and GitHub Copilot coding agent.
Use Agent Skills to:
- Create reusable capabilities that work across different GitHub Copilot tools
- Define specialized workflows for testing, debugging, or deployment processes
- Share capabilities with the AI community using the open standard
- Include scripts, examples, and other resources alongside instructions
Prompt files
Prompt files, also known as slash commands, let you simplify prompting for common tasks by encoding them as standalone Markdown files that you can invoke directly in chat. Each prompt file includes task-specific context and guidelines about how the task should be performed.
Use prompt files to:
- Simplify prompting for common tasks, such as scaffolding a new component, running and fixing tests, or preparing a pull request
- Override default behavior of a custom agent, such as creating a minimal implementation plan, or generating mockups for API calls
Custom agents
Custom agents enable you to let the AI assume different personas for specific roles or tasks, like a database administration, front-end development, or planning. A custom agent is described in a Markdown file that defines its behavior, capabilities, tools, and language model preferences.
Use custom agents to:
- Create specialist custom agents that focus on a specific task or role, giving them only the relevant context and tools
- Create modular workflows by orchestrating multiple specialized agents, where each agent handles a specific part of the process
- Help optimize context usage for complex tasks by running custom agents as subagents
MCP and tools
MCP and tools provide a gateway to external services and specialized tools through Model Context Protocol (MCP). This extends the agent's capabilities beyond code and the terminal, and enable it to interact with databases, APIs, and other development tools. MCP Apps let you define rich user experiences, like dashboards or forms, to facilitate complex interactions.
Use MCP and tools to:
- Connect database tools to query and analyze data without leaving your development environment
- Integrate with external APIs to fetch real-time information or perform actions
Hooks
Hooks enable you to execute custom shell commands at key lifecycle points during agent sessions. Hooks provide deterministic, code-driven automation that runs regardless of how the agent is prompted.
Use hooks to:
- Enforce security policies by blocking dangerous commands before they execute
- Automate code quality workflows by running formatters and linters after file edits
- Create audit trails of all tool invocations for compliance
- Inject project context into agent sessions automatically
Agent plugins
Note: Agent plugins is currently in preview.
Agent plugins are pre-packaged bundles of chat customizations that you can discover and install from plugin marketplaces. A single plugin can provide slash commands, skills, custom agents, hooks, and MCP servers. Installed plugins appear alongside your locally defined customizations.
Use agent plugins to:
- Discover and install ready-made customizations from plugin marketplaces
- Extend Copilot with community-contributed commands, skills, and tools
- Add additional marketplaces, including private repositories
Language models
Language models let you choose from different AI models optimized for specific tasks. You can switch between models to get the best performance for code generation, reasoning, or specialized tasks like vision processing. Bring your own API key to access more models or have more control over model hosting.
Use different language models to:
- Use a fast model for quick code suggestions and simple refactoring tasks
- Switch to a more capable model for complex architectural decisions or detailed code reviews
- Bring your own API key to access experimental models or use locally hosted models
Set up your project for AI
Implement AI customizations incrementally. Start with the basics and add more as needed.
-
Initialize your project: Type
/initin chat to analyze your workspace and generate a.github/copilot-instructions.mdfile with coding standards and project context tailored to your codebase. Review and refine the generated instructions. -
Add targeted rules: Create file-based
*.instructions.mdfiles to apply specific rules for different parts of your codebase, such as language conventions or framework patterns. -
Automate repetitive tasks: Create prompt files for common workflows like component generation, code reviews, or documentation. Add MCP servers to connect external services like issue trackers or databases.
-
Create specialized workflows: Build custom agents for specific roles or project phases. Package reusable capabilities as agent skills to share across tools and minimize context usage.
-
Generate customizations with AI: Type
/create-prompt,/create-instruction,/create-skill,/create-agent, or/create-hookin chat to generate any customization file with AI assistance. Describe what you want, and the agent asks clarifying questions and produces the file. You can also extract customizations from an ongoing conversation by asking in natural language, such as "save this as a skill" or "turn this into a reusable prompt".
Chat Customizations editor
The Chat Customizations editor is currently in preview.
The Chat Customizations editor provides a centralized UI for discovering, creating, and managing all your chat customizations in one place, instead of working with individual files and commands.
To open the Chat Customizations editor, run Chat: Open Chat Customizations from the Command Palette (⇧⌘P (Windows, Linux Ctrl+Shift+P)).
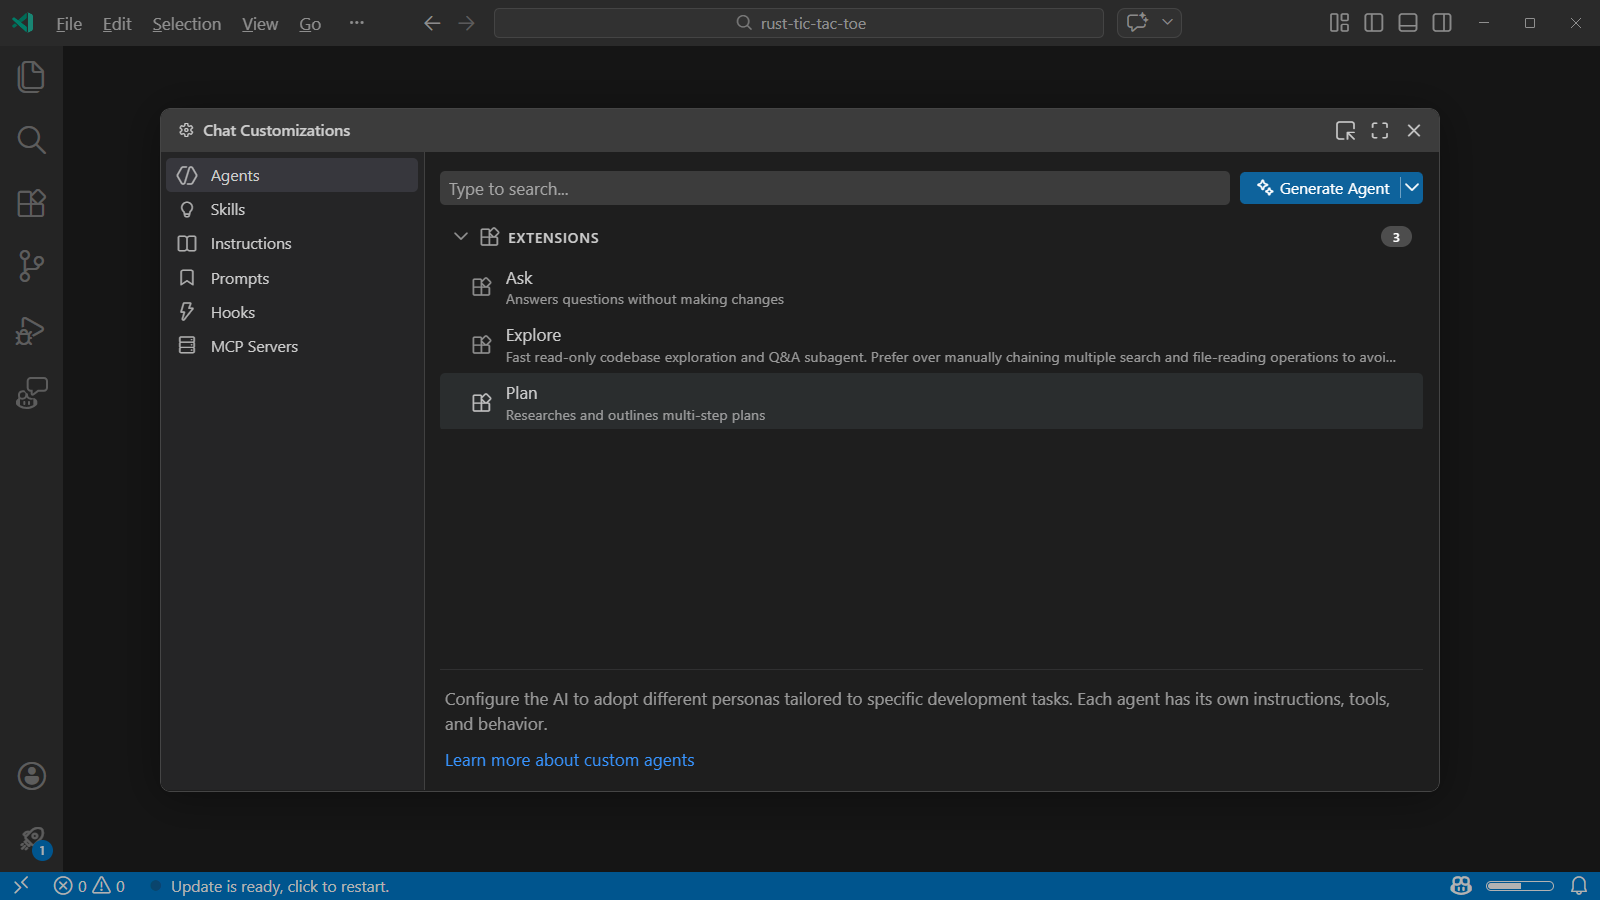
The editor sidebar lists seven customization categories:
- Agents - custom agents for specialized AI personas
- Skills - agent skills with instructions, scripts, and resources
- Instructions - custom instruction files for coding standards and guidelines
- Prompts - prompt files for repeatable tasks
- Hooks - lifecycle automation scripts
- MCP Servers - external tool integrations, with marketplace browsing and installation
Select a category to view all existing customizations. From each category, you can:
- Create new customizations for your workspace or user profile, with the option of AI-guided generation
- Search and filter by name, description, or filename
- Select an item to edit it in an embedded code editor
- Browse and install MCP servers from the marketplace (in the MCP Servers section)
Troubleshoot customization issues
If your customization files aren't being applied or are causing unexpected behavior, use the chat customization diagnostics view to identify problems.
Select Configure Chat (gear icon) > Diagnostics in the Chat view to see all loaded custom agents, prompt files, instruction files, and skills along with any errors. Check for issues like syntax errors, invalid configurations, or problems loading resources.
Learn more about troubleshooting AI in VS Code.